How we got this Development Consent APPROVED for a new Alfresco Outdoor Room through Ku-ring Gai Council…
A lot of people can start shaking uncontrollably just by the thought or even a whisper of the words ‘Development Application’.
Even worse, they can go into heart attack mode soon after, when you then add the phrase ‘Ku-ring Gai Council’. But you don’t need to curl up into a ball in the corner.
There is a way. It’s just a matter of following some simple rules or guidelines & following a process to get the result that you are looking for.
This is an example of how we progressed through this process & obtained a Development Consent approval for our alfresco outdoor living space in Wahroonga.
Often people will start their discussions with me by saying they want their area to be 25 metres squared, or I want it approved by a certifier or that ABC thingy (it’s actually CDC which stands for Complying Development Certificate).
That’s a sign – already I know that they are scared, looking for the easy option – the quick way through the maze. They might have heard a sob story or two from a builder friend who knocked up a chicken coup one day & that has put them off.
Generally I find that they are either being fed the wrong information or not looking past point number 1 in the Exempt Development Checklist (essentially just looking at the 25 metre squared bit) & then quickly brushing over the remaining eleven because it doesn’t make too much sense & then all seems too hard.
”“…but its only a deck & a roof, do I really need an approval?”
It was only last week where I was told from an enquiry that his neighbor who is a builder, gave his two cents worth in relation to the approval for the Alfresco Outdoor Room, advising that “it won’t be a hassle at all”, also adding “why even bother with an approval, it’s only a small add on”.
During our online meeting, whilst evaluating the photos of where he would like the new alfresco area to be & understanding the picture he had in his mind; I could quickly see that what he was looking to construct would definitely need a Development Application through his local council.
But the “wise” words from the neighbor, had already had his mind set. His eye was now off the ball & he was starting to focus on the wrong thing.
To bring him back, my advice was
-
- Let’s start designing your dream space Throw everything in; all the bits & pieces you’ve seen on Pinterest & in the magazines.
- Don’t start designing something around Exempt Development or CDC requirements Why? More often than not, when people start their process this way they end up trying to fit a square peg into a round hole. They are not getting what they want & they are always sacrificing something in their outdoor living space, just to avoid an approval process.
Let me put this another way for you…
If you go and buy a brand spanking new Toyota Land Cruiser for say $120,000 would you just drive it out the dealership with no rego or insurance because you believe that you’re the best driver in town, with the newest SUV that has all the best safety features?
You won’t have an accident? I won’t hit anyone. I know all the secret spots where the police hide so I won’t get pulled over.
Sounds ludicrous doesn’t it.
So why would you spend well over six figures ($100,000 +) on your biggest asset & investment (your home) without doing all the right checks and balances?
Generally speaking, most of our alfresco outdoor rooms require an approval process; so we are used to it, but sometimes it takes some education to potential clients about what is right & what is required.
So, where did we start…
Essentially these first steps are the make or break in the process.
Think of it like baking a cake. You have a recipe, a method & a list of ingredients. You have to do things in a certain way & in a certain order to make it work.
You don’t necessarily have to follow the script or the recipe; but by not following the proven recipe it can mean that you could end up with the chocolate cake that looks a fair bit different to the one you thought you were going to get.
-
- We understood the clients ‘ideal’ wants & desires
In our initial online meeting with the client, we reviewed the photos that they sent through to help in painting the picture of their dreams.They talked about how they had a ‘dead’ space. An area that wasn’t getting used at all; it was only some grass & stepping stones, but they thought it had some great potential.The key for them was to get some connection/‘flow’ back into their home & create a space which they can entertain, down by the pool.A must have inclusion was the outdoor kitchen to the alfresco. Why? Because the main kitchen & internal dining area was upstairs, so entertaining down by the pool in their new Alfresco Outdoor Room would mean a long trudge, up a windy staircase back to the kitchen.A second, separate area was also discussed; which could be used more as a tranquil, coffee & newspaper type of area. This was a freestanding space amongst the grassed area. This initial online discussion & first step in the process is key to the success in getting that picture that our client has in their mind come to real life. During this meeting, I am reviewing numerous areas to make sure that these pieces of the puzzle can fit together. If they can’t fit, it’s not worth going any further.Essentially, these are the four areas that we work through together:
- Design:
Are they looking to build the Opera House in their backyard? - Construction:
Is it possible to build the Opera House in their backyard? - Approval:
Can we get the council to approve the Opera House in their backyard? - Budget:
The Opera House wasn’t cheap to build. Does their budget match the reality?
If we get a cross against any one of these four, we need to address it. Do they really need the Opera House or were they thinking this as this is all they really know of?
What if we changed the design? Often I use the phrase… “Sometimes simpler can be better” (To read more on design CLICK HERE)
This could then mean an easier approval & construction process, which in turn will naturally lead to a different budget.
Bingo! Winner, winner chicken dinner.
Below is a snippet of what the client sent through in their initial enquiry.
- Design:
- We understood the clients ‘ideal’ wants & desires
- We did our research first…
Before we met in person with our client, there’s a lot of work we’ve already done. All this information helps us to do our homework so we can guide the client down the right path. We investigated what we can and can’t do for them within the regulations, bushfire zoning and council requirements etc.
- At home Design Consultation with the clients
After doing our homework, we met with our client at their home. This paid meeting is where we got a little bit creative, learned more about their style and unlocked the potential for the new outdoor room.We looked at the outdoor space from every angle, discussing with them all the details from the best viewpoints, the right roof and flooring to the size of the table they needed when entertaining. We took some detailed measurements and notes so we can go away to prepare our design.
- We went away & did some homework
Now that we had some concrete notes, measurements & details we could really sink our teeth into it.Here we spoke to our Town Planner to review things early such as the landscape ratios & the like.
- 3d render presentation
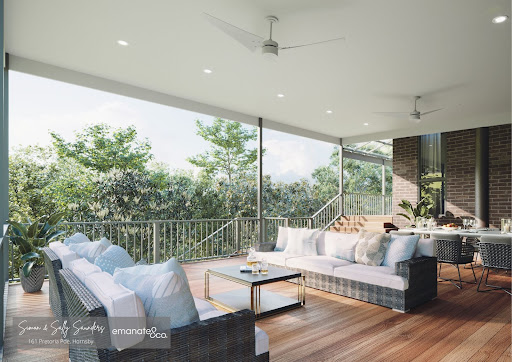
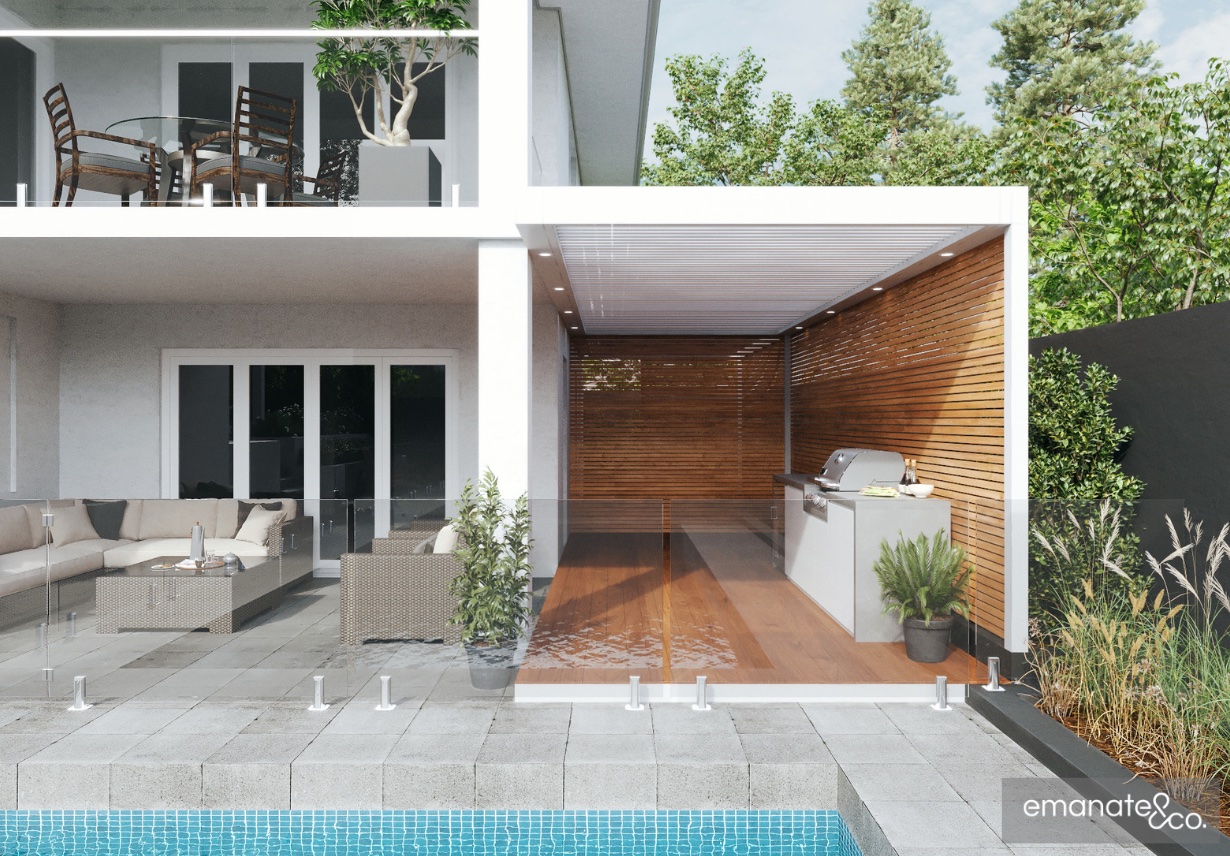
Included in our initial investment was the clients first glimpse of their new outdoor room. We presented the 3D render along with our proposal during a meeting at our office, where they could see our display.We’ve taken everything we’ve discussed earlier and rendered it into a 3D design. The client could see exactly what goes where, the colours and accessories. They could really imagine what it will be like to have that first BBQ with their friends in their new outdoor room.By meeting at our display, they could also touch and look at the materials for themselves, and see the quality and finishes we’ll achieve for their outdoor space. Below are the two renders that we presented to the clients.
- Pre Application Preparation:
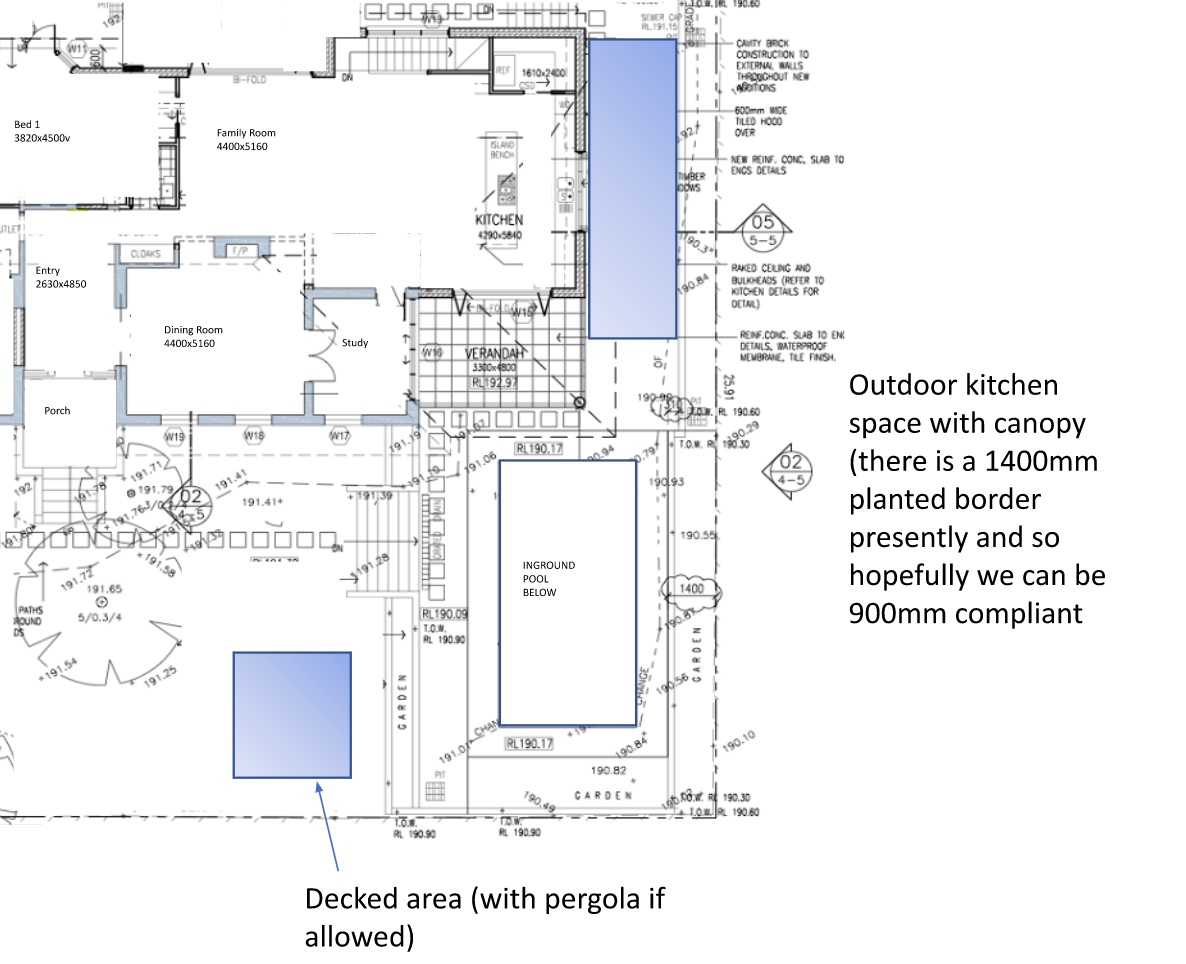
This was probably one of the key points in the whole process.We all knew that the stand alone, freestanding area could be a concern & we also knew that this wasn’t the clients top priority – the main alfresco outdoor room next to the pool was.So after site visits, Town Planning consultation, DCP (Development Control Plan) deep dive we decided to remove the stand alone area from the application.The landscape & built upon areas were already too tight & we thought that by including this space into the application; it would tip it too quickly into the ‘declined’ basket.
We thought that by only having the alfresco outdoor room next to the pool in the Development Application to council, it would not be a “given” to get the approval, but the chances of getting the tick of approval would be higher.
We were like water
Huh?? “We flowed…”
Essentially we finessed the concept of the design with the planning assessor at council in order to get the approval.
We & more importantly our client knew that this could be coming, so we were prepared & really it was no surprise (see above).
The assessing officer at council asked us to confirm some information which we relayed back to them, but ultimately they were looking for some compensation in the new design to allow for the increase in the built upon area in the backyard.
We argued that we couldn’t compromise the design of new alfresco outdoor living area as essentially we were limited in its size by the existing side retaining wall (which wasn’t going to be relocated), along with the two existing door ways which would lead out into the area.
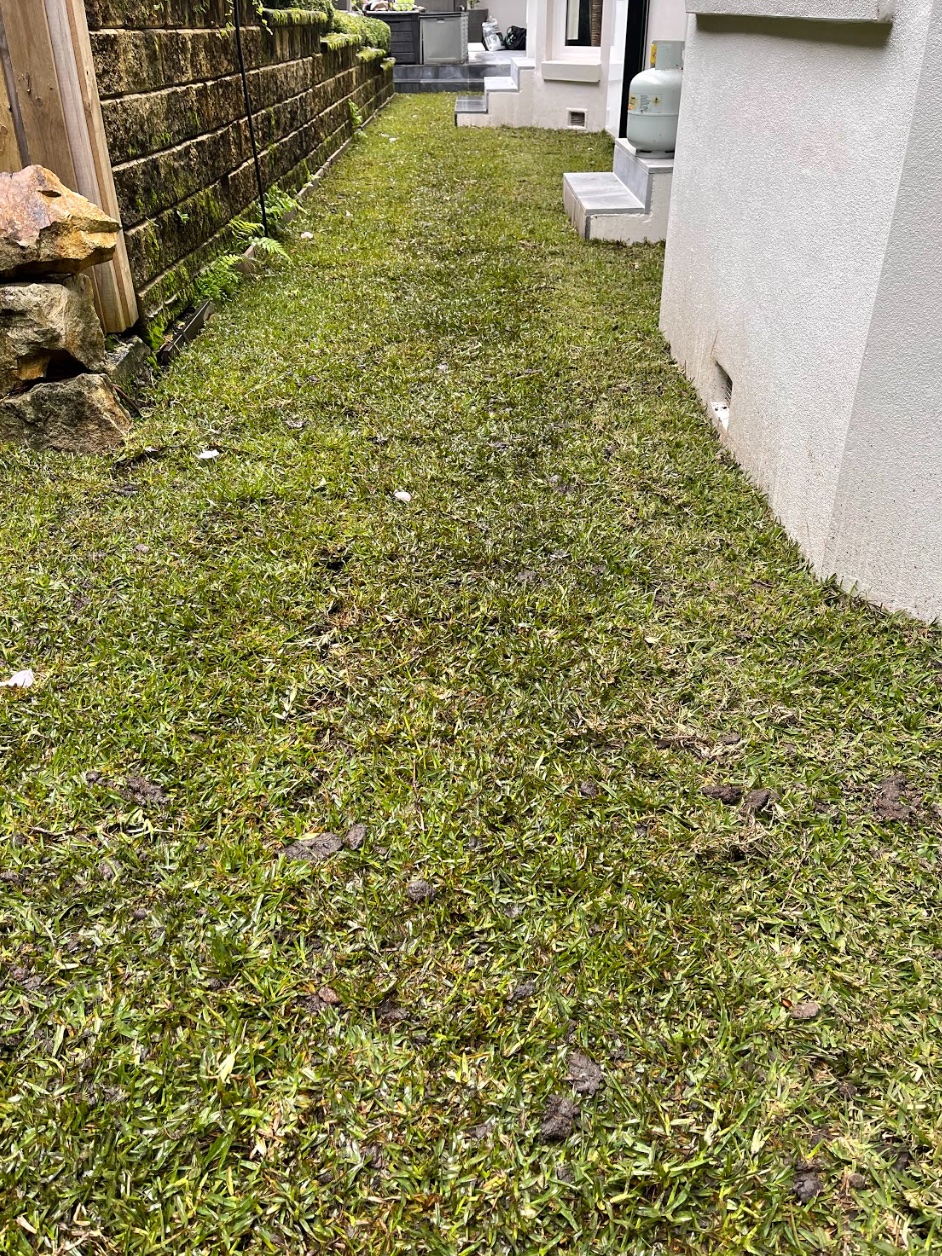
As an alternative there was a narrow gravel area along another side of the home with square stepping stones running through which accounted for a portion of the existing built upon area of the property.
By removing the gravel & the stepping stones & replacing them with grass (soft surface) we were able to reach an agreement that the main outdoor living area could remain unchanged, which was exactly what we were after.
What else happened??
There’s more? You are kidding me!
As part of the approval process you always have to get Sydney Water approval.
This surprises most people, but it’s just a part of the approval process – its just one of those boxes that you have to tick to keep moving forward.
More often than not it is smooth sailing, but there is generally always a handful each year which rear its ugly head.
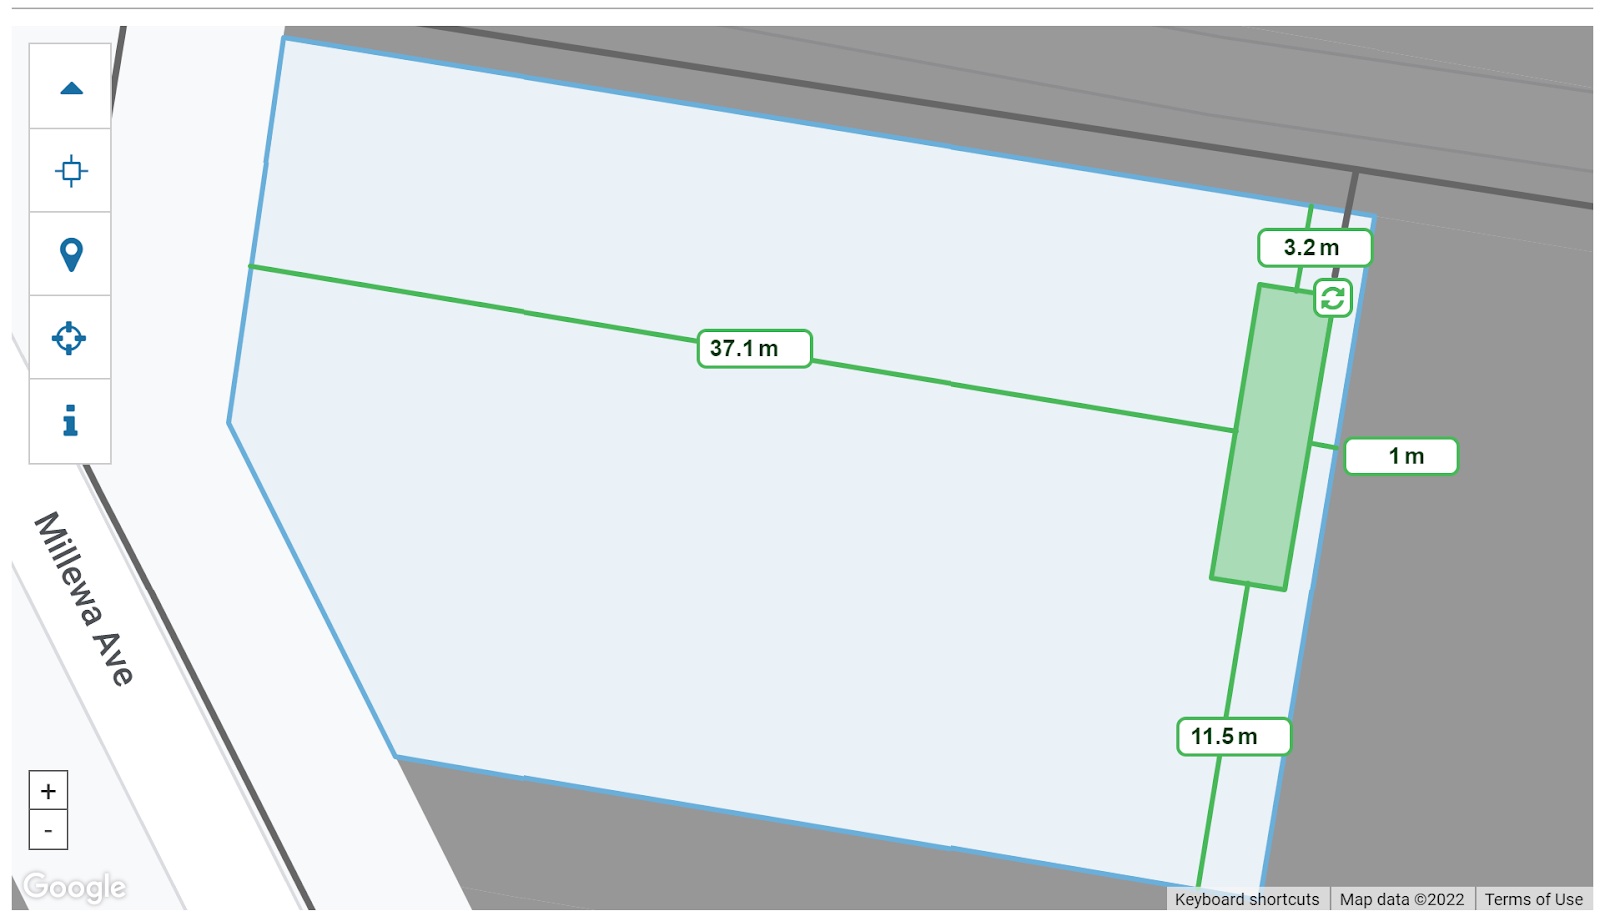
We found tucked away in the corner of the garden, behind the retaining wall with all of the bushes growing over it, was manhole cover. A big, black, round lid just sitting there quietly; like the ones you see in the movies when someone is walking down the footpath in New York City.
“So what?” you say.
Well it’s kind of a big deal as we need that Sydney Water stamp of approval to move through the process & get the final tick of approval to start work.

What do you need?
- Full & recent site survey
This enables you to get your plans & levels right, but more importantly it is a requirement of the application. So, without it you won’t get past the front gate at council. - Planning Portal
This is the NSW State Government online system where you lodge all of the ‘paperwork’, reports etc to get the ball rolling. This can be a little bit tricky so you might need some help here. - Statement of Environmental Effects
This is a 28 page document that was created with our Town Planner which addresses the allowances & constraints in Council’s Development Control Plan - Waste Management Plan
- Valuation of works estimate
- Owners Consent
- Schedule of Colors
- FULL set of plans (This doesn’t just mean a one pager with a few drawings on it.)
- Site analysis plan
- Floor Plan
- Elevations x 3
- Roof Plan
Notes:/Take Away Points:
- Understand the parameters
Know what you are working around at the beginning, that way there won’t be any surprises later down the track. It would mean reviewing the council’s Development Control Plan (DCP) along with the National Construction Code (NCC, or previously known as the ABC).
You should be addressing these in your submission within the - Prepare
Not only get the right people around you, but get all of the bits & pieces together early. Don’t try & ‘fudge the system’ & submit the application when you know that something is missing. It only slows the process down & means more backwards & forwards. Review the council’s Development Application checklist - Submit ALL of the required information
Over the last 12 months, the process has changed significantly as to how a Development Application is required to be lodged. After its lodged, it doesn’t mean that you sit back & sip your shandy thinking the work has been done. “No” – essentially you haven’t even got to first base. The application has to get through the gate keeper.
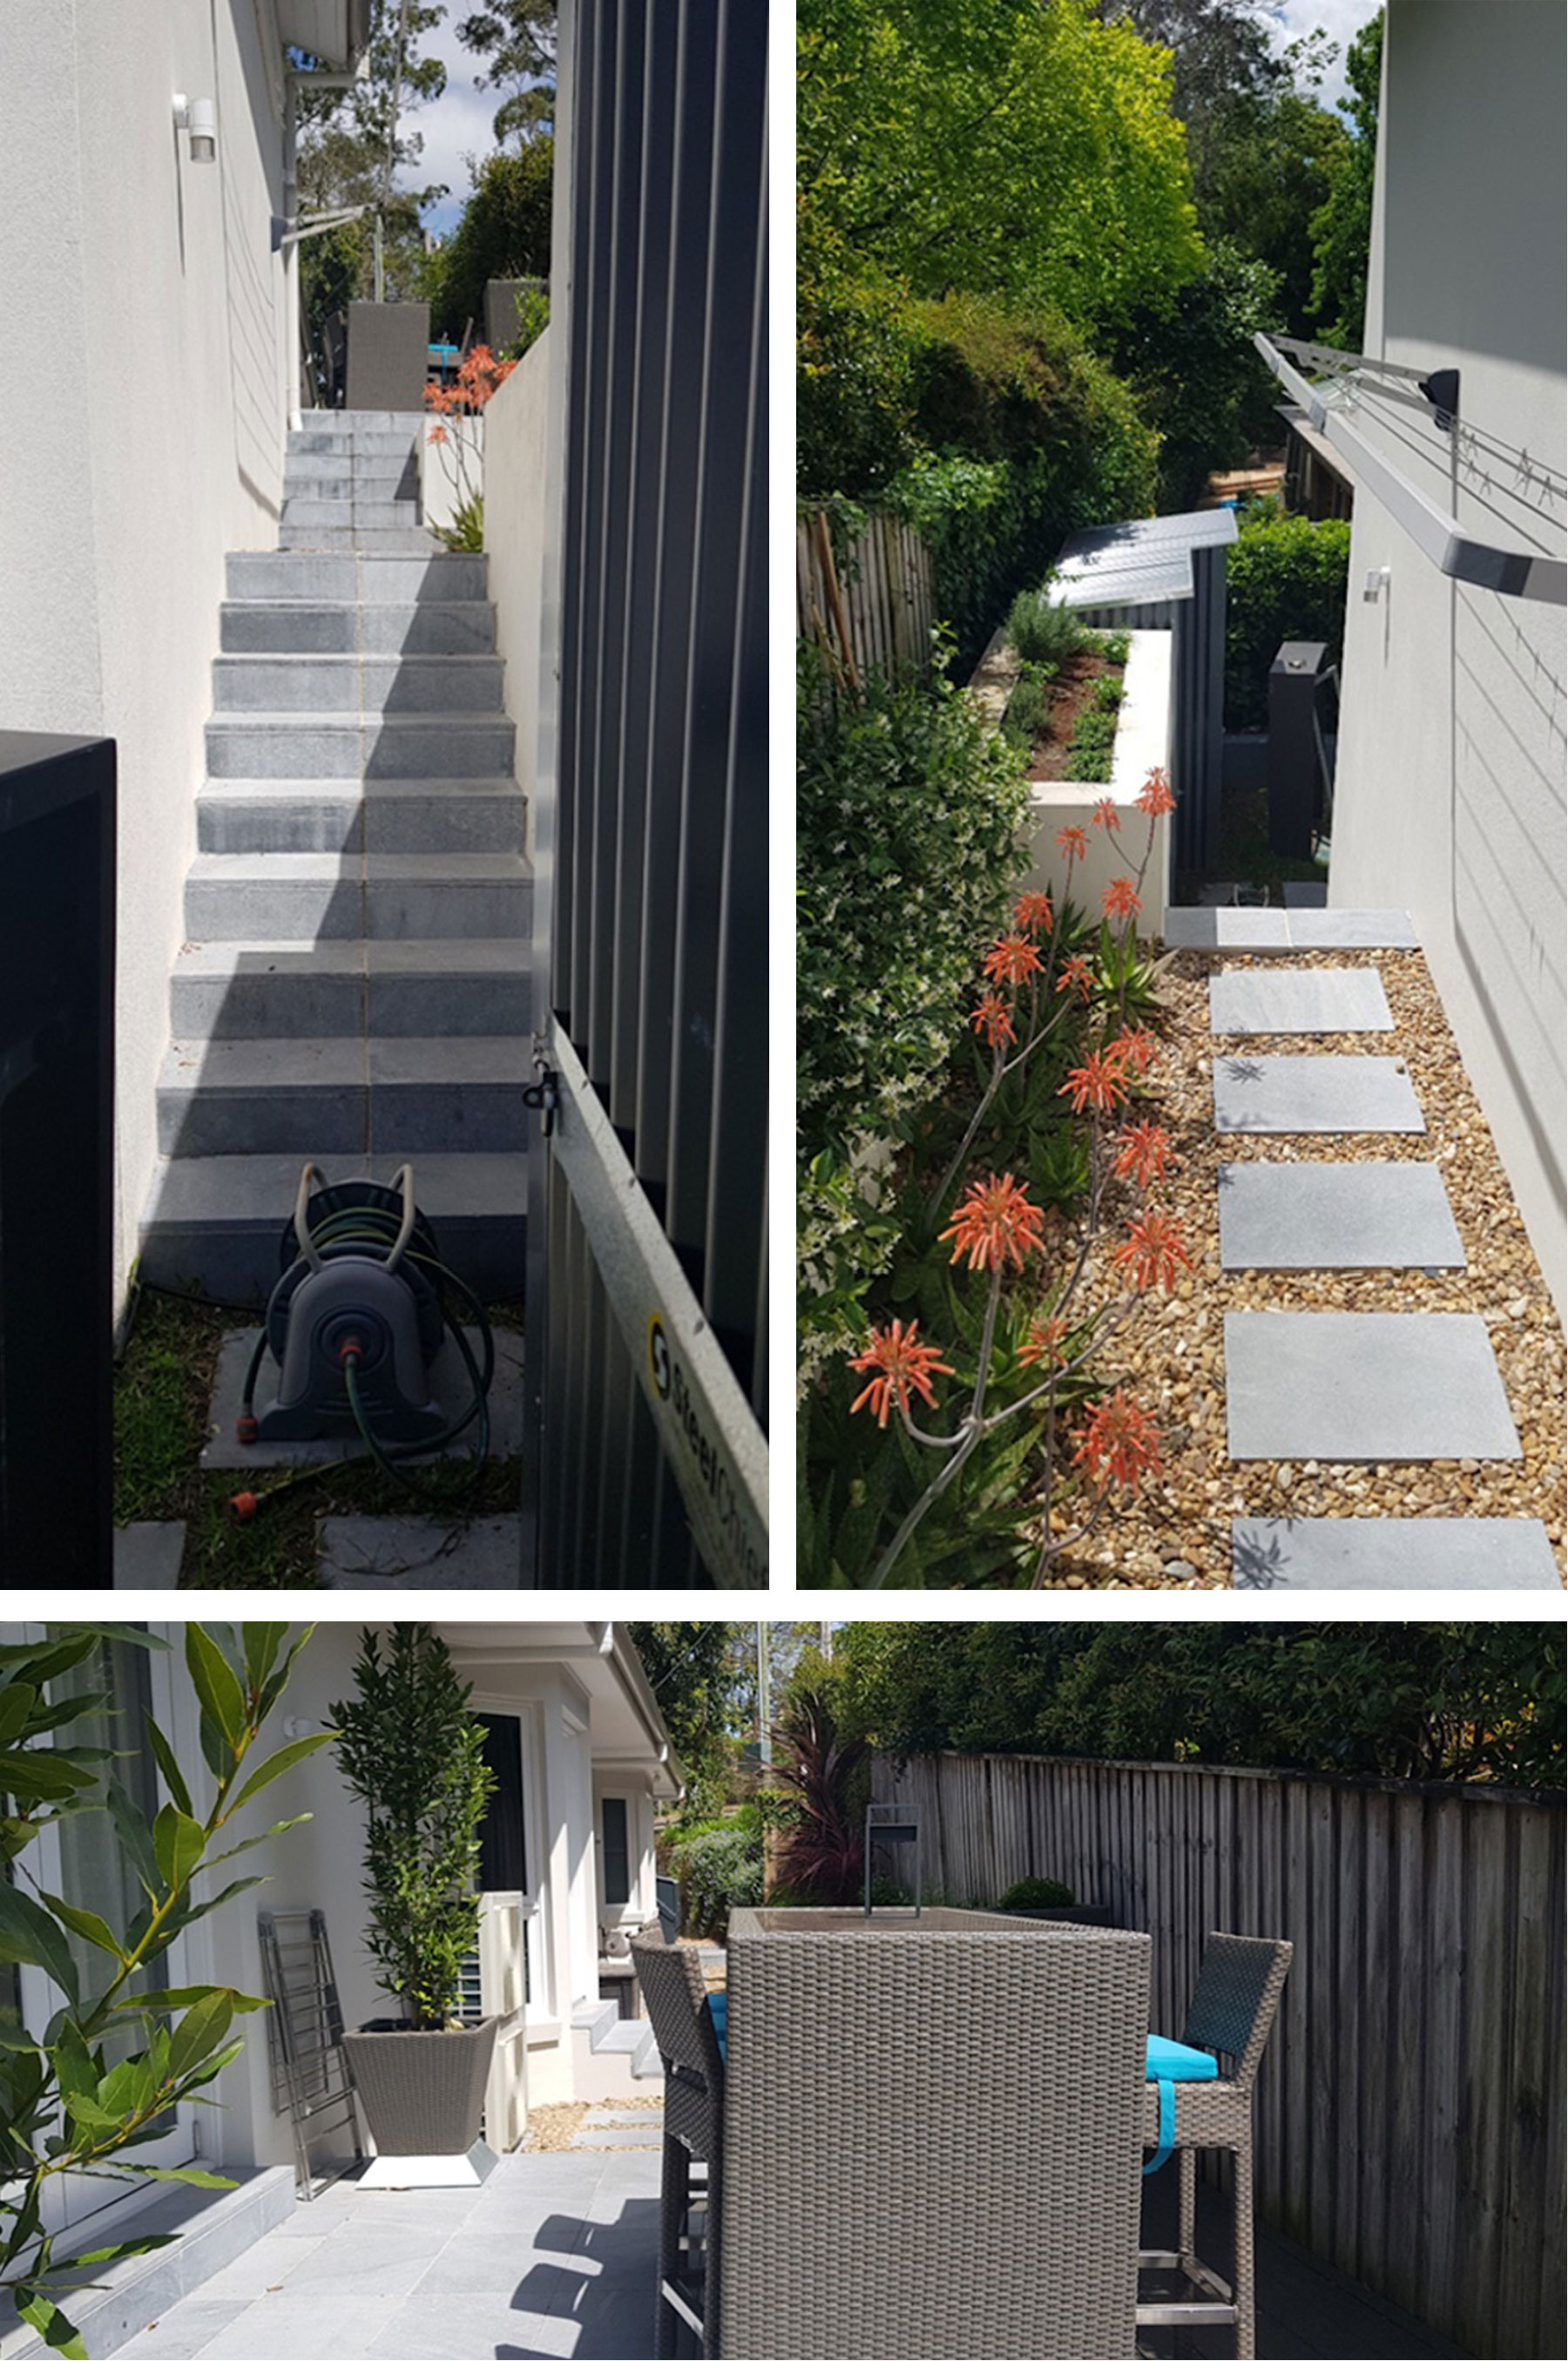
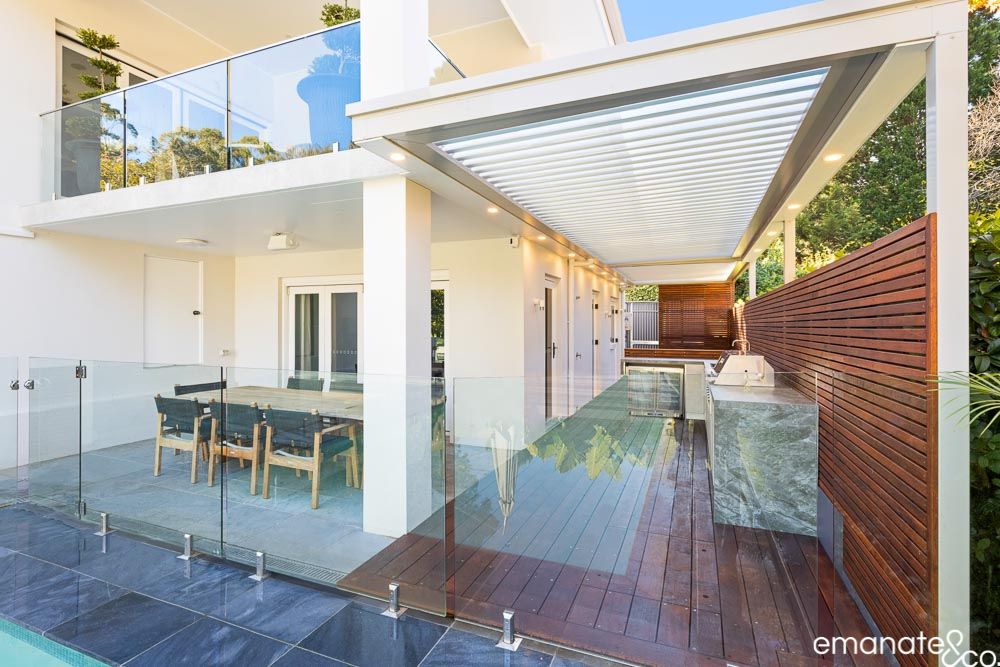
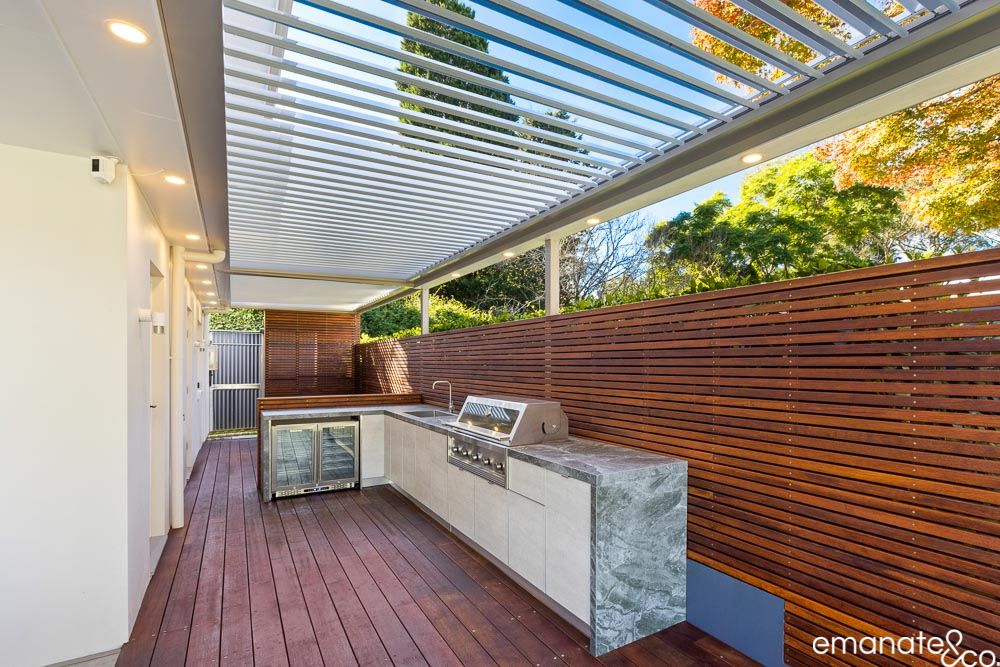
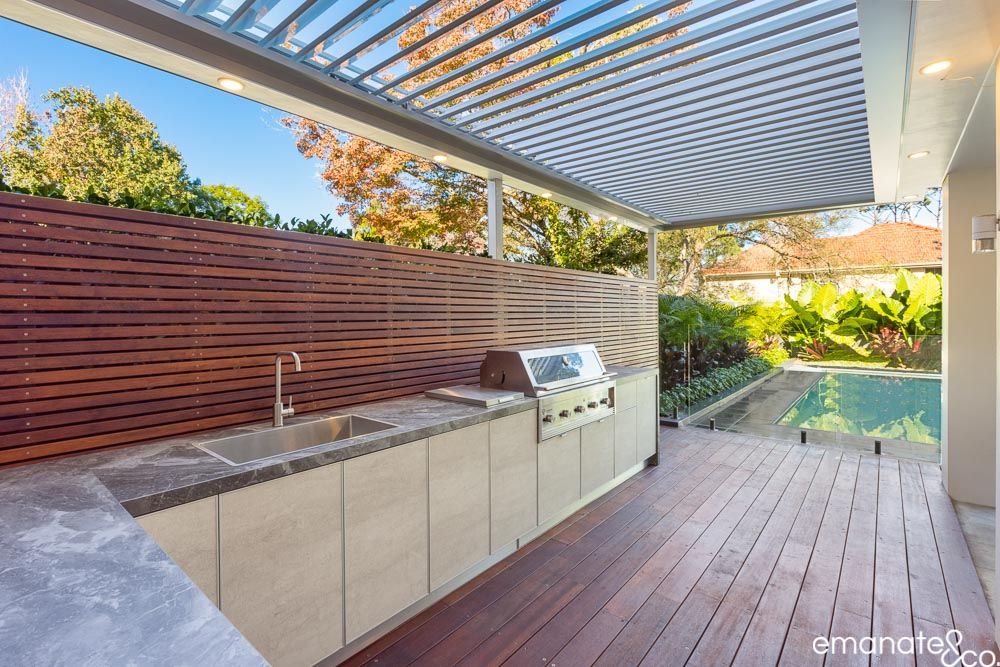
What’s the end result?
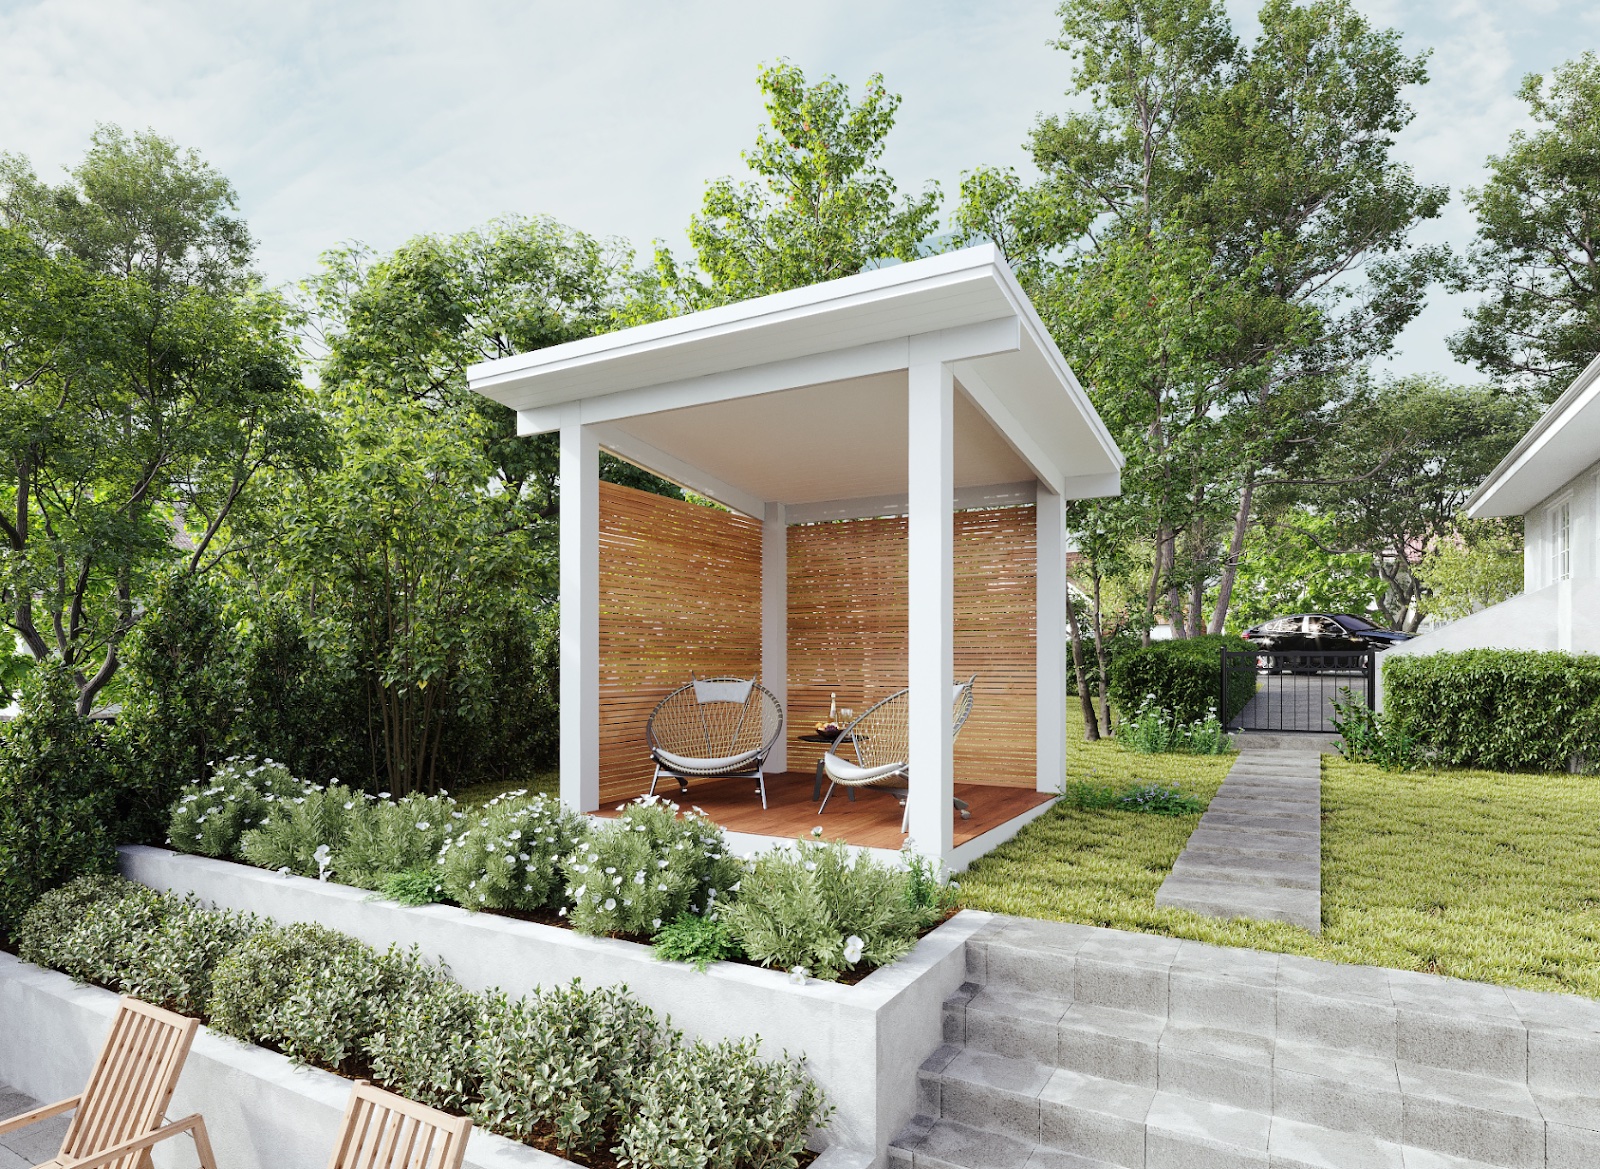
We’ll just leave these beautiful photos here of the end result…
What else could help you?
- Podcast – here Adrian interview industry leaders in ‘Out the Back Door’, which is a podcast that gets you in front of some industry experts to give you the best advice about all things building in your backyard.
Listen Here - Get some inspiration through our Case Studies
Have a look here at our previous works to get some ideas - Have a look at this Outdoor Room journey
This is a beautiful alfresco room we’ve created for this family which has essentially added a whole new element to their home.
Have a closer look at this transformation here